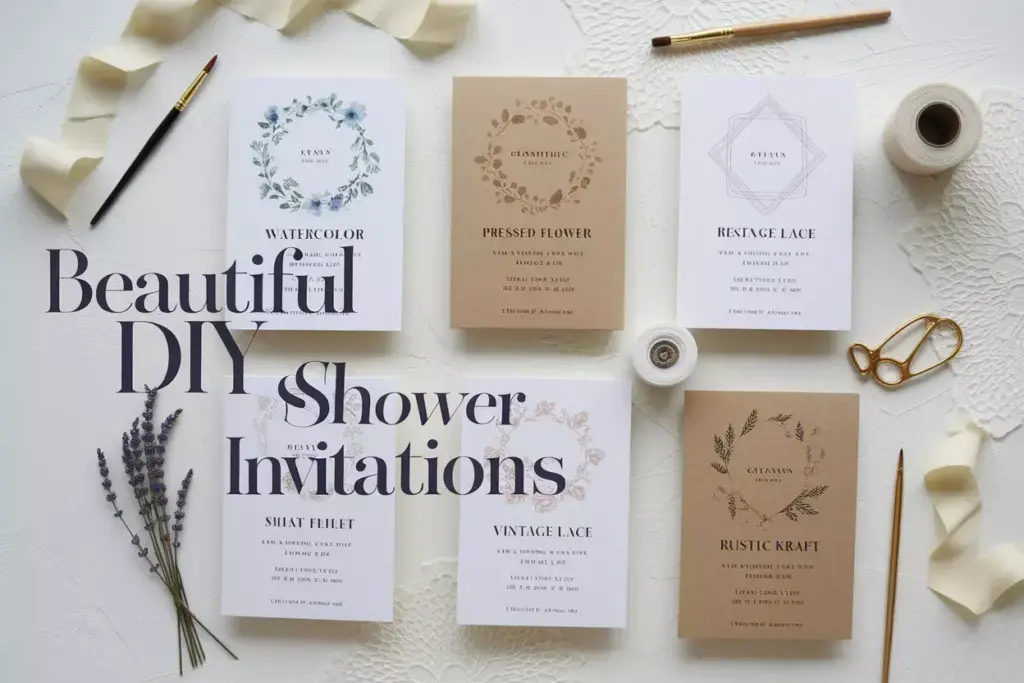
6 DIY Bridal Shower Invitations That Are Easy & Absolutely Gorgeous
Planning a bridal shower can feel overwhelming, especially when trying to balance elegance with budget constraints. The invitation sets the tone for the entire celebration, making it one of the most important elements to get right. Creating 6 DIY bridal shower invitations that are easy & absolutely gorgeous doesn’t require professional design skills or expensive materials—just a little creativity and the right guidance to craft stunning invitations that guests will treasure.
Key Takeaways
- Simple materials create stunning results – Basic craft supplies like cardstock, watercolors, and ribbon can produce professional-looking invitations
- Personalization adds meaningful value – Hand-lettered details and custom touches make DIY invitations more special than store-bought options
- Time-saving techniques maximize efficiency – Assembly line methods and template shortcuts help create multiple invitations quickly
- Budget-friendly options deliver elegance – DIY invitations cost 60-70% less than custom designs while maintaining sophisticated appeal
- Versatile designs suit any theme – From rustic charm to modern minimalism, these projects adapt to various bridal shower styles
Why Choose DIY Bridal Shower Invitations?
Creating handmade invitations offers numerous advantages beyond cost savings. DIY bridal shower invitations allow complete creative control over design elements, ensuring perfect alignment with the shower theme and bride’s personality. According to wedding industry data, couples who incorporate DIY elements into their celebrations report 40% higher satisfaction with their events [1].
The personal touch of handmade invitations creates an immediate emotional connection with recipients. Guests appreciate the time and effort invested in crafting something unique, often keeping these special invitations as keepsakes long after the celebration ends.
Cost comparison benefits:
- Professional custom invitations: $8-15 per piece
- DIY invitations: $2-4 per piece
- Potential savings: $300-500 for 50 invitations
Essential Supplies for Creating Beautiful DIY Invitations
Before diving into specific 6 DIY bridal shower invitations that are easy & absolutely gorgeous, gathering the right materials ensures smooth crafting sessions and professional results.
Basic Materials Needed
Paper and Cardstock:
- High-quality cardstock (110-130 lb weight)
- Vellum or translucent paper
- Decorative scrapbook paper
- Watercolor paper for painted designs
Writing and Design Tools:
- Fine-tip calligraphy pens
- Watercolor paints and brushes
- Metallic markers (gold, silver, rose gold)
- Ruler and cutting mat
- Bone folder for crisp creases
Embellishment Supplies:
- Ribbon in coordinating colors
- Wax seals and sealing wax
- Dried flowers or pressed botanicals
- Adhesive gems or pearls
- Double-sided tape and glue sticks
Time-Saving Organization Tips
Setting up an efficient workspace dramatically improves the invitation-making process. Organize supplies in labeled containers and create an assembly line system for consistent results across multiple invitations.
Recommended timeline:
- Design planning: 2-3 days
- Material gathering: 1 week
- Creation process: 2-3 weekends
- Addressing and mailing: 1 week
6 Easy & Gorgeous DIY Bridal Shower Invitation Designs
1. Watercolor Floral Elegance
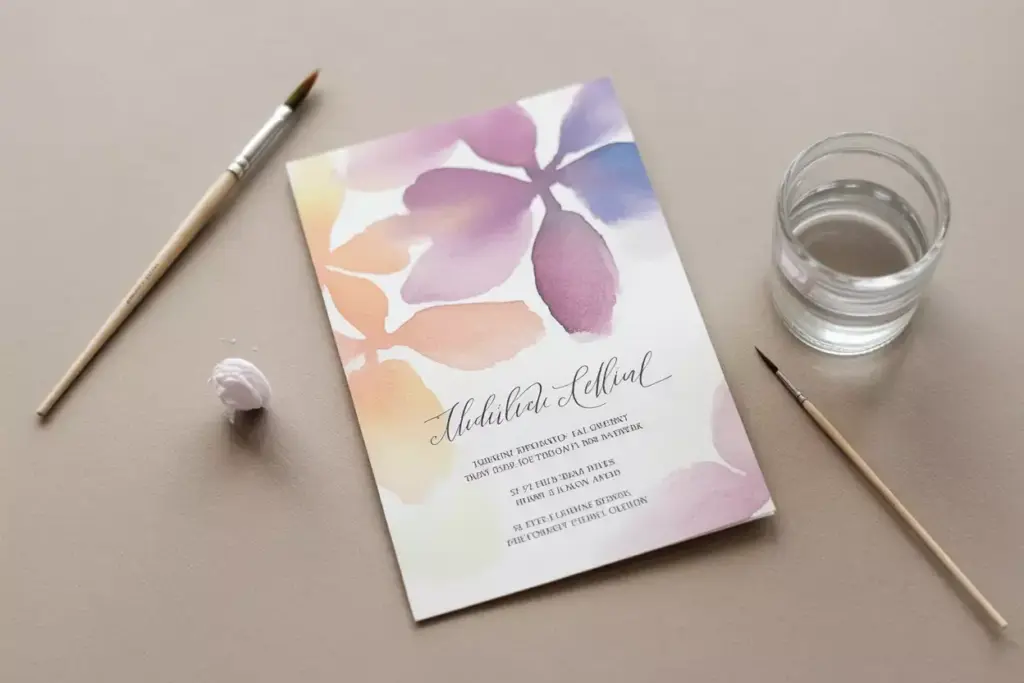
This romantic design combines soft watercolor backgrounds with elegant typography, creating invitations that feel both artistic and sophisticated. The watercolor technique requires minimal skill but produces stunning, unique results for each invitation.
Materials needed:
- Watercolor paper (5×7 inches)
- Watercolor paints in soft pastels
- Fine brush and water container
- Black calligraphy pen
- Clear protective spray
Step-by-step process:
Creating the watercolor base:
Start with slightly damp watercolor paper to achieve beautiful color blending. Apply light washes of pink, lavender, or peach in organic, flowing shapes. Allow colors to bleed naturally into each other, creating soft gradients that resemble delicate flower petals.
Adding floral elements:
Once the base layer dries completely, add simple floral shapes using slightly more concentrated paint. Focus on basic forms like five-petal flowers and simple leaves rather than detailed botanical illustrations. The beauty lies in the organic, imperfect nature of watercolor.
Typography and text:
Use a fine calligraphy pen to add invitation text over the dried watercolor. Choose areas with lighter color saturation for optimal readability. Consider using a simple script font or clean sans-serif lettering for modern appeal.
Finishing touches:
Seal completed invitations with clear protective spray to prevent smudging. Add subtle shimmer with a light dusting of pearl powder while the spray is still slightly tacky.
2. Pressed Flower Botanical Beauty
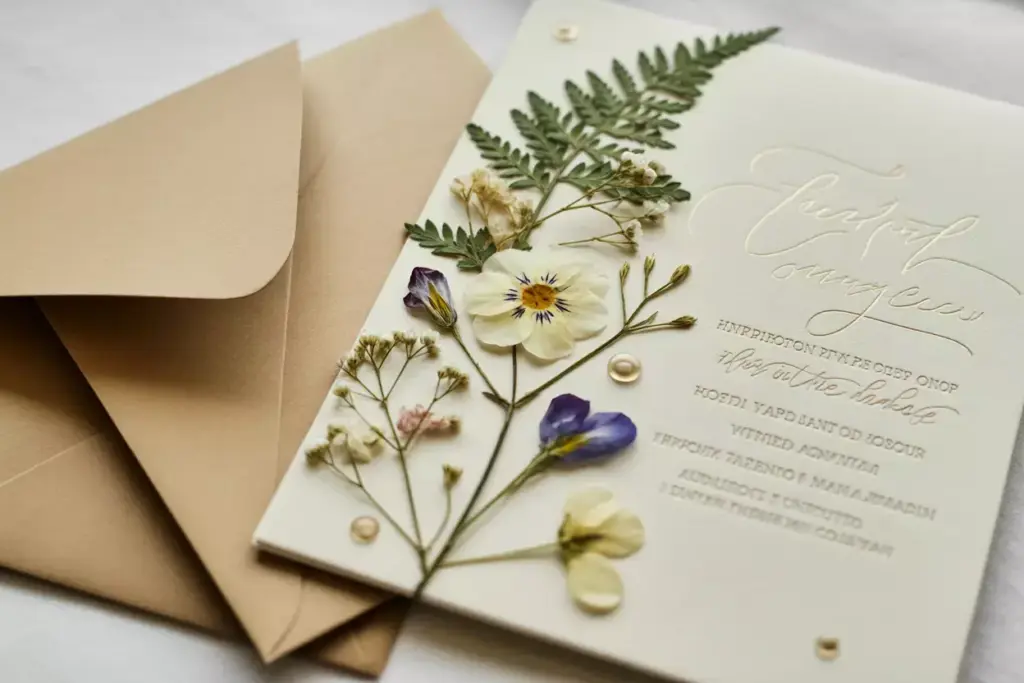
Natural pressed flowers create stunning focal points for bridal shower invitations while adding texture and organic beauty. This design works particularly well for garden parties, outdoor celebrations, or nature-loving brides.
Materials needed:
- Cream or white cardstock
- Pressed flowers (pansies, baby’s breath, ferns)
- Clear adhesive sheets or mod podge
- Gold metallic pen
- Coordinating envelopes
Flower pressing techniques:
Quick pressing method:
For immediate results, use an iron on low heat with parchment paper to press fresh flowers. This technique works well for delicate blooms like violets and small ferns, producing usable flowers within minutes.
Traditional pressing:
Place flowers between absorbent paper inside heavy books for 2-3 weeks. This method preserves color better and creates more durable pressed specimens for invitation use.
Design assembly:
Arrange pressed flowers on cardstock before adhering to test different compositions. Create balanced asymmetrical designs by placing larger flowers off-center and balancing with smaller elements. Secure flowers with tiny dots of clear adhesive, avoiding visible glue marks.
Text integration:
Use metallic gold or copper pens to write invitation details around the floral arrangement. The metallic ink complements natural elements beautifully while ensuring excellent readability against cream backgrounds.
3. Modern Minimalist Geometric
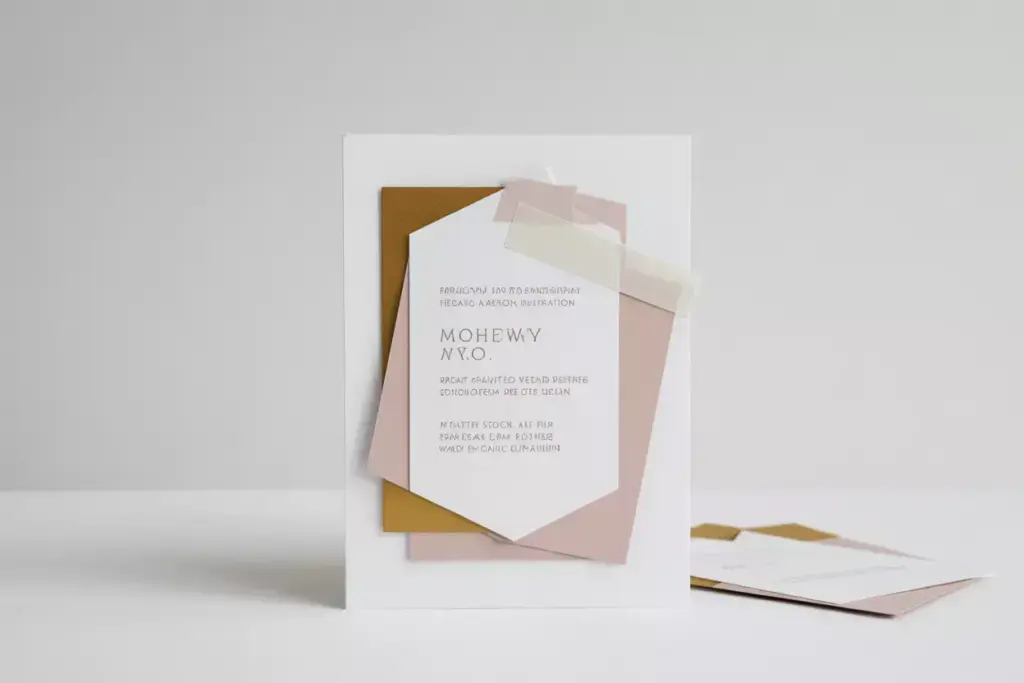
Clean lines and geometric shapes create sophisticated invitations perfect for contemporary brides who appreciate understated elegance. This design relies on precise execution and thoughtful color choices rather than elaborate embellishments.
Materials needed:
- High-quality white cardstock
- Colored cardstock in accent colors
- Precision cutting tools
- Double-sided tape
- Modern font printouts or stencils
Geometric design principles:
Shape selection:
Choose 2-3 geometric shapes maximum to maintain visual clarity. Triangles, hexagons, and circles work particularly well for bridal shower themes. Vary sizes while maintaining consistent proportional relationships between elements.
Color palette strategy:
Limit the color palette to 2-3 coordinating shades plus white. Popular combinations include blush pink with gold accents, sage green with cream, or navy blue with silver details.
Assembly techniques:
Cut geometric shapes with precision using templates or cutting machines for consistent results. Layer shapes to create depth and visual interest while maintaining the clean, modern aesthetic.
Typography choices:
Select clean, sans-serif fonts that complement the geometric theme. Avoid overly decorative typefaces that compete with the geometric elements. Consider using different font weights to create hierarchy in the invitation text.
4. Vintage Lace Romance
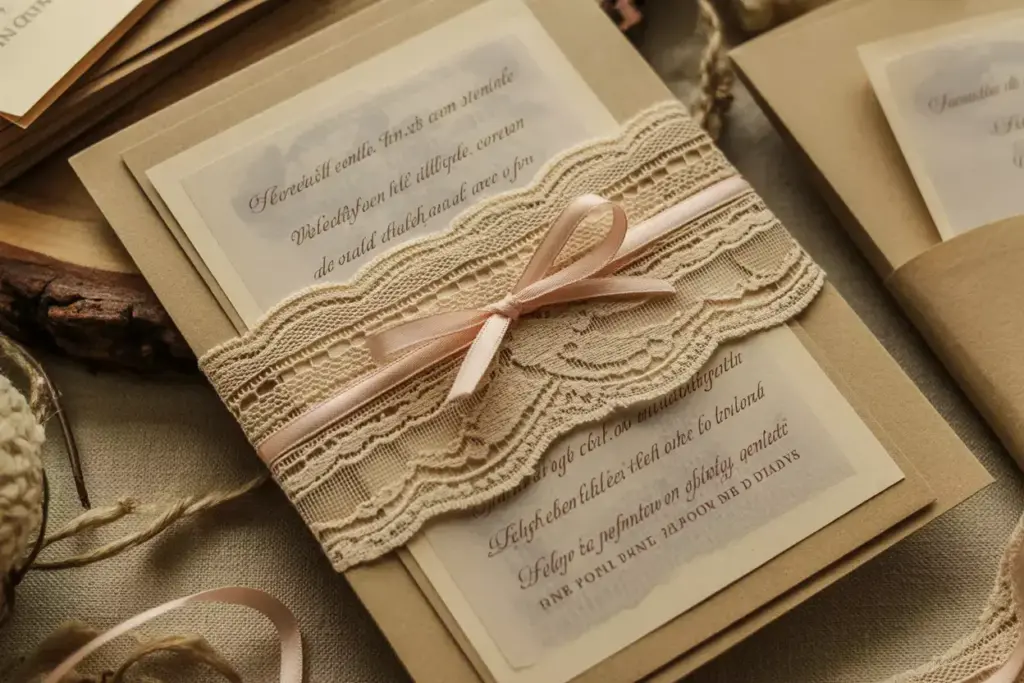
Incorporating vintage lace elements creates timeless, romantic invitations that evoke classic elegance. This design works beautifully for traditional brides or vintage-themed celebrations.
Materials needed:
- Kraft or cream cardstock
- Vintage lace trim or doilies
- Ribbon in coordinating colors
- Sepia or brown ink pads
- Twine or baker’s string
Lace application techniques:
Layering methods:
Create depth by layering different lace patterns and textures. Start with larger lace pieces as background elements, then add smaller, more intricate details on top. Ensure each layer contributes to the overall design without overwhelming the invitation text.
Aging effects:
Lightly distress paper edges and apply subtle ink staining to create authentic vintage appeal. Use tea or coffee staining for natural aging effects that complement the lace elements perfectly.
Text presentation:
Print invitation text on translucent vellum for a romantic, ethereal effect when layered over lace backgrounds. Alternatively, use vintage-style fonts printed directly on aged cardstock for a more rustic approach.
Finishing details:
Tie invitations with narrow ribbon or twine, creating small bows that enhance the romantic theme. Consider adding small vintage buttons or pearl accents for extra elegance.
5. Rustic Kraft Paper Charm
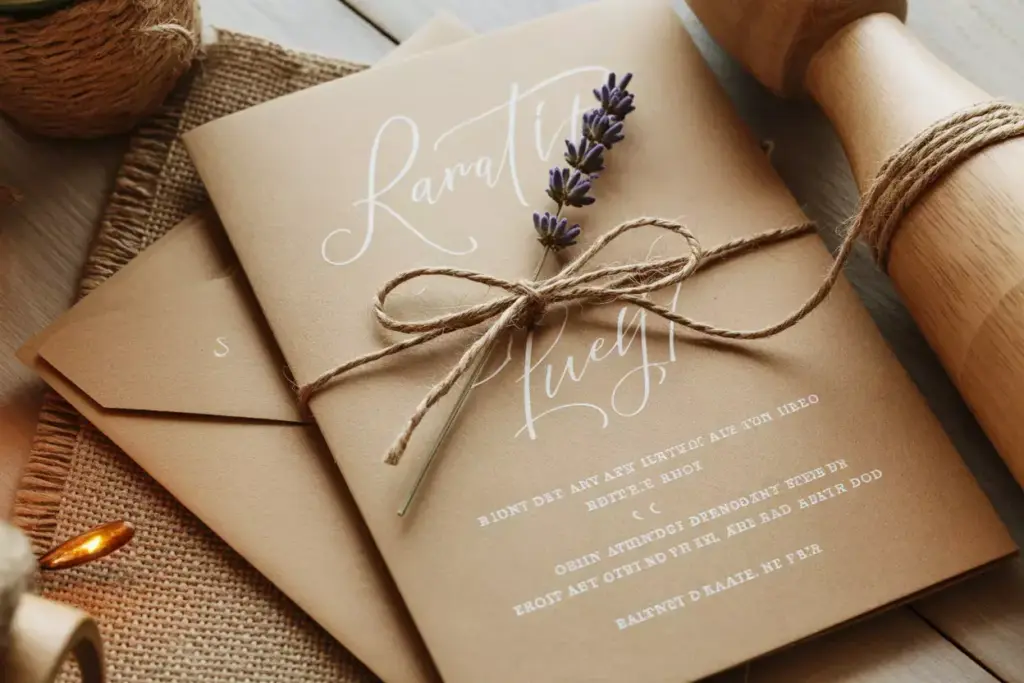
Kraft paper provides an excellent foundation for rustic, casual bridal shower invitations that feel warm and approachable. This design works particularly well for outdoor celebrations, barn venues, or country-themed showers.
Materials needed:
- Natural kraft cardstock
- White or cream ink pens
- Twine or jute string
- Small dried flowers or herbs
- Brown paper bags for envelopes
Rustic design elements:
Typography approach:
Use hand-lettering or fonts that mimic handwritten text for authentic rustic appeal. White ink on kraft paper creates excellent contrast while maintaining the casual, approachable aesthetic.
Natural embellishments:
Incorporate small sprigs of dried lavender, baby’s breath, or rosemary tied with twine. These natural elements add fragrance and texture while reinforcing the rustic theme.
Envelope alternatives:
Create matching envelopes from brown paper bags, trimming to appropriate size and sealing with wax stamps or stickers. This approach maintains design consistency while adding unique charm.
Assembly finishing:
Tie completed invitations with natural twine, creating rustic bows that guests can easily untie. Consider adding small kraft paper tags with additional event details or directions.
6. Elegant Calligraphy Sophistication
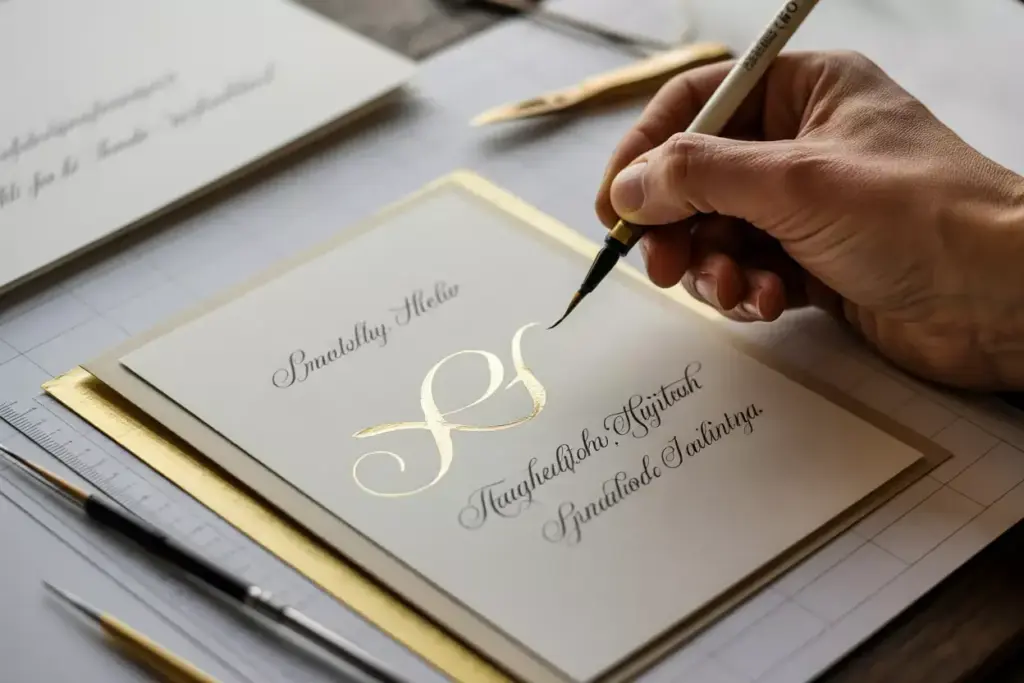
Hand-lettered calligraphy creates the most personalized and elegant invitation option, perfect for formal celebrations or brides who appreciate traditional artistry.
Materials needed:
- Premium white or cream cardstock
- Calligraphy pens in various nib sizes
- Practice paper
- Ruler and pencil for guidelines
- Gold or silver leaf accents (optional)
Calligraphy techniques for beginners:
Basic stroke practice:
Master fundamental strokes before attempting full letters. Practice upstrokes (thin) and downstrokes (thick) to develop muscle memory and consistent letter formation.
Layout planning:
Sketch invitation layouts lightly in pencil before applying ink. Plan text hierarchy with larger script for names and events, smaller text for details and dates.
Consistency strategies:
Create letter templates or practice sheets to maintain consistent character sizing and spacing across multiple invitations. Take breaks to prevent hand fatigue that can affect letter quality.
Enhancement options:
Add subtle gold leaf accents to first letters or important words for luxury appeal. Apply leaf carefully with adhesive pen for precise placement and professional results.
Pro Tips for Professional-Looking Results
Achieving 6 DIY bridal shower invitations that are easy & absolutely gorgeous requires attention to detail and strategic planning. These professional techniques elevate homemade invitations to compete with expensive custom designs.
Quality Control Strategies
Consistency checks:
Create the first invitation as a master template, then replicate exact measurements, color placement, and text positioning for all subsequent pieces. Use this master as a reference throughout the creation process.
Color matching:
Purchase all materials from the same supplier when possible to ensure consistent color matching across invitations, envelopes, and accessories. Test color combinations under different lighting conditions before committing to final designs.
Time Management Techniques
Batch processing:
Complete similar tasks across all invitations simultaneously rather than finishing one invitation at a time. Cut all paper pieces first, then apply all backgrounds, followed by text addition and final embellishments.
Quality timeline:
Allow adequate drying time between steps to prevent smudging or damage. Rush jobs often result in imperfections that detract from the overall professional appearance.
Common Mistakes to Avoid
Overcrowding designs:
Resist the temptation to include too many decorative elements. Clean, balanced designs appear more sophisticated and ensure invitation text remains easily readable.
Inconsistent spacing:
Use rulers and guidelines to maintain consistent margins and text spacing across all invitations. Uneven spacing immediately signals amateur craftsmanship to recipients.
Poor paper quality:
Invest in high-quality cardstock and papers that feel substantial in recipients’ hands. Flimsy materials undermine even the most beautiful designs and create poor first impressions.
Addressing and Presentation Tips
The final presentation of 6 DIY bridal shower invitations that are easy & absolutely gorgeous significantly impacts recipient perception and event anticipation.
Envelope Coordination
Design consistency:
Create envelopes that complement invitation designs without competing for attention. Use coordinating colors and similar design elements while keeping envelope decoration subtle and elegant.
Addressing techniques:
Maintain the same calligraphy style or font used on invitations for envelope addressing. Consider printing guest addresses on clear labels for consistent, professional appearance when hand-lettering isn’t practical.
Mailing Considerations
Protection strategies:
Insert invitations in protective sleeves or tissue paper to prevent damage during mailing. Add “Hand Cancel” requests to postal workers to avoid machine processing that can damage dimensional elements.
Timing coordination:
Mail invitations 4-6 weeks before the bridal shower date to allow adequate response time. Include RSVP deadlines 2 weeks before the event for accurate headcount planning.
Assembly Line Efficiency
Workspace organization:
Set up dedicated workspace with all materials easily accessible. Good lighting and comfortable seating prevent fatigue and maintain quality throughout the creation process.
Helper coordination:
Recruit friends or family members to assist with simple tasks like envelope stuffing or ribbon cutting. Provide clear instructions and examples to maintain quality standards while increasing efficiency.
Budget Breakdown and Cost Analysis
Understanding the financial benefits of creating 6 DIY bridal shower invitations that are easy & absolutely gorgeous helps justify the time investment and demonstrates significant savings compared to professional alternatives.
Material Cost Estimates
| Design Type | Materials Cost | Time Investment | Professional Equivalent | Savings |
|---|---|---|---|---|
| Watercolor Floral | $45-60 for 50 pieces | 8-10 hours | $400-600 | $340-540 |
| Pressed Flower | $35-50 for 50 pieces | 6-8 hours | $450-650 | $400-600 |
| Modern Geometric | $25-40 for 50 pieces | 5-7 hours | $350-500 | $310-460 |
| Vintage Lace | $40-55 for 50 pieces | 7-9 hours | $400-550 | $345-495 |
| Rustic Kraft | $20-35 for 50 pieces | 4-6 hours | $300-450 | $265-415 |
| Elegant Calligraphy | $30-45 for 50 pieces | 10-12 hours | $500-750 | $455-705 |
Hidden Value Benefits
Customization flexibility:
DIY invitations allow unlimited revisions and personalization without additional fees. Professional designers typically charge $50-100 for each round of revisions.
Skill development:
Learning these crafting techniques provides valuable skills for future wedding projects, baby showers, and other special events, multiplying the long-term value of the time investment.
Sentimental value:
Handmade invitations become meaningful keepsakes that guests often preserve, creating lasting memories that extend far beyond the initial cost savings.
Troubleshooting Common DIY Challenges
Even with careful planning, creating 6 DIY bridal shower invitations that are easy & absolutely gorgeous can present unexpected challenges. Preparing for common issues ensures smooth crafting sessions and professional results.
Design Problem Solutions
Uneven watercolor application:
If watercolor appears blotchy or uneven, lightly mist the entire surface with clean water and blend colors while still damp. This technique often salvages imperfect applications and creates interesting organic effects.
Smudged calligraphy:
Allow each letter to dry completely before moving to the next word. Keep a clean paper towel nearby to rest writing hands and prevent accidental smudging of completed sections.
Crooked text alignment:
Use light pencil guidelines that can be erased after ink dries. Create templates with pre-marked text lines for consistent alignment across multiple invitations.
Material Management Issues
Insufficient supplies:
Order 15-20% more materials than calculated needs to account for practice pieces, mistakes, and potential damage during creation. Running out of matching materials mid-project can delay completion significantly.
Color variations:
Test all materials together before beginning the full project. Different paper types can cause ink and paint colors to appear differently than expected, requiring adjustments to the original design plan.
Time Management Solutions
Realistic scheduling:
Double initial time estimates to account for learning curves, drying time, and inevitable mistakes. Rushing the process often results in lower quality outcomes that require starting over.
Break scheduling:
Take regular breaks to prevent hand fatigue and maintain consistent quality. Fresh eyes often catch mistakes that tired crafters miss during extended working sessions.
Conclusion
Creating 6 DIY bridal shower invitations that are easy & absolutely gorgeous offers the perfect combination of personal satisfaction, cost savings, and meaningful customization. Each design option provides unique aesthetic appeal while remaining accessible to crafters of all skill levels. From the romantic watercolor florals to elegant calligraphy sophistication, these invitation styles ensure every bride can find the perfect match for her celebration vision.
The time investment required for these projects pays dividends through significant cost savings, skill development, and the creation of truly personalized keepsakes that guests will treasure. By following the detailed instructions, professional tips, and troubleshooting guidance provided, anyone can produce stunning invitations that rival expensive custom designs.
Ready to start crafting? Choose the design that best matches the bridal shower theme and bride’s personality, gather the recommended materials, and set aside dedicated crafting time. Remember that perfection isn’t the goal—the love and effort invested in handmade invitations creates their true beauty and value. Begin with a single practice invitation to test techniques and build confidence before creating the full set.
The joy of receiving a handcrafted invitation sets the perfect tone for a celebration filled with love, thoughtfulness, and personal touches that make bridal showers truly memorable.
References
[1] The Wedding Report – Annual Wedding Industry Statistics, 2026 Edition