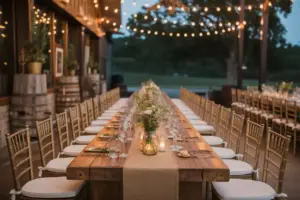
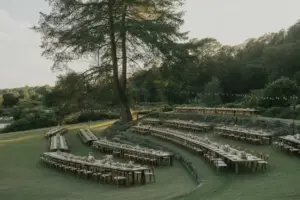
6 Simple DIY Wedding Centerpieces You Can Make in a Weekend
Picture this: your dream wedding is just weeks away, but your centerpiece budget has you breaking into a cold sweat. The good news? Creating stunning 6 Simple DIY Wedding Centerpieces You Can Make in a Weekend doesn’t require a degree in floral design or a trust fund. With just two days and some creativity, couples across the country are crafting magazine-worthy centerpieces that rival expensive florist arrangements—all while saving hundreds of dollars.
Wedding costs continue to soar in 2026, with the average couple spending over $30,000 on their special day [1]. However, savvy brides and grooms are discovering that DIY centerpieces offer the perfect solution to stretch their budget without sacrificing style. These weekend projects not only save money but also add a personal touch that guests will remember long after the last dance.
Key Takeaways
- Budget-friendly elegance: Each centerpiece costs under $20 to create, saving couples $200-500 compared to professional arrangements
- Weekend timeline: All six centerpiece styles can be completed in 48 hours with basic crafting skills
- Versatile designs: These DIY options work for various wedding themes, from rustic barn venues to elegant ballrooms
- Personal touch: Handmade centerpieces reflect the couple’s personality and create meaningful conversation starters
- Stress-free execution: Simple techniques and readily available materials make these projects accessible for beginners
Why Choose DIY Wedding Centerpieces for Your Special Day?
The trend toward DIY wedding centerpieces you can make in a weekend has exploded in recent years, and for good reason. Beyond the obvious cost savings, handmade centerpieces offer couples complete creative control over their wedding aesthetic. Unlike cookie-cutter floral arrangements, DIY projects allow for customization that reflects personal style and wedding themes.
Financial Benefits 💰
- Average savings of $15-25 per centerpiece
- Total potential savings: $300-600 for a 20-table reception
- Leftover materials can be repurposed for other wedding décor
Creative Advantages ✨
- Complete control over color schemes and materials
- Ability to incorporate sentimental elements
- Flexibility to adjust designs based on venue requirements
- Opportunity to involve wedding party in crafting sessions
Practical Considerations 🎯
- Projects can be completed weeks in advance
- No last-minute florist coordination required
- Easy transportation and setup
- Backup options available if pieces break
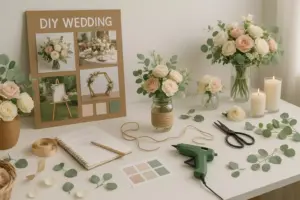
Planning Your DIY Centerpiece Weekend Project
Success with 6 simple DIY wedding centerpieces you can make in a weekend requires strategic planning and organization. Smart couples start by creating a detailed timeline and gathering all necessary supplies before diving into the creative process.
Essential Planning Steps
Friday Evening Preparation (2-3 hours)
- Organize all materials and tools in one workspace
- Review instruction guides and watch tutorial videos
- Prepare any elements that need drying time (painted items, glued components)
- Set up assembly line stations for efficient workflow
Saturday Focus (6-8 hours)
- Complete 3 centerpiece styles
- Focus on more time-intensive projects first
- Take breaks to maintain quality and creativity
- Document successful techniques for Sunday’s work
Sunday Completion (4-6 hours)
- Finish remaining 3 centerpiece styles
- Add final touches and quality checks
- Package completed pieces for safe storage
- Create setup instructions for wedding day volunteers
Budget Planning and Material Sourcing
Creating beautiful centerpieces on a budget requires strategic shopping and material selection. The following breakdown helps couples maximize their investment:
| Material Category | Budget Range | Best Sources | Money-Saving Tips |
|---|---|---|---|
| Containers/Vases | $2-8 each | Thrift stores, dollar stores | Buy in bulk, repurpose household items |
| Fresh Flowers | $3-12 per arrangement | Wholesale markets, grocery stores | Choose in-season blooms, buy Friday for weekend use |
| Candles | $1-5 each | Discount retailers, online bulk | LED alternatives last longer, safer for venues |
| Decorative Elements | $1-10 per centerpiece | Craft stores, clearance sections | Use coupons, shop end-of-season sales |
1. Mason Jar Elegance with Floating Candles
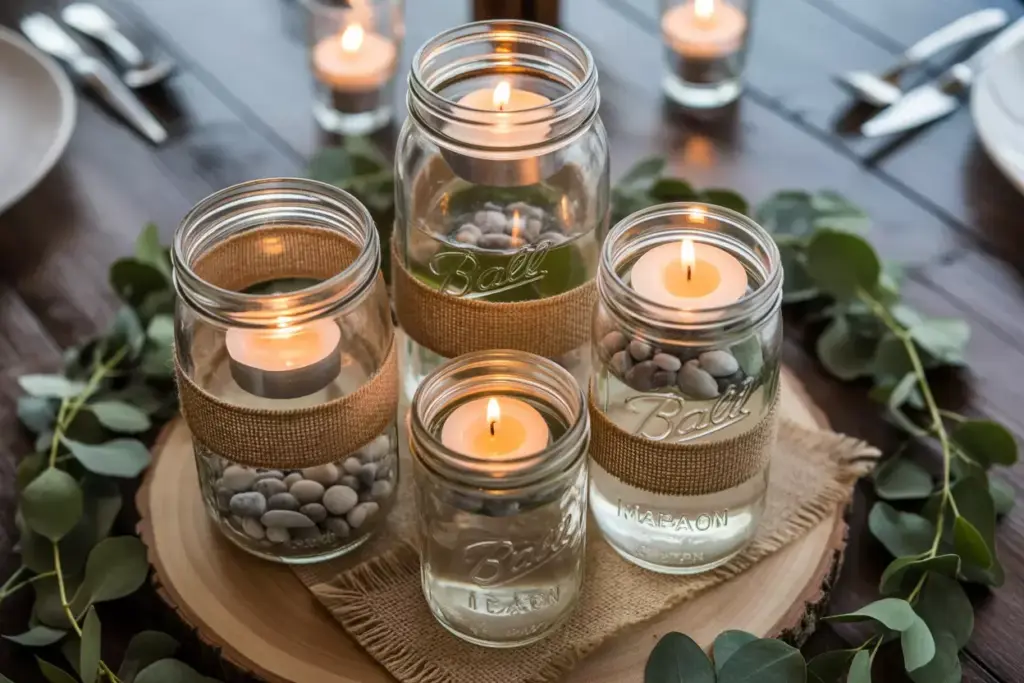
The first of our 6 simple DIY wedding centerpieces you can make in a weekend combines rustic charm with sophisticated ambiance. Mason jar centerpieces remain popular because they work beautifully for both outdoor and indoor celebrations while requiring minimal crafting experience.
Materials Needed (Per Centerpiece)
- 3 mason jars (varying heights: quart, pint, half-pint)
- Floating candles (6-8 pieces)
- Fresh eucalyptus or greenery sprigs
- Burlap ribbon or twine
- Small river rocks or glass pebbles
- Waterproof LED tea lights (backup option)
Step-by-Step Instructions
Preparation Phase (30 minutes)
- Clean and dry all mason jars thoroughly to ensure clear glass appearance
- Wrap each jar with burlap ribbon, securing with hot glue or double-sided tape
- Add decorative base by placing 1-2 inches of river rocks in each jar
- Arrange height variation by grouping jars in triangular formation
Assembly Process (20 minutes per set)
- Fill jars with water leaving 2 inches from rim for floating candles
- Insert greenery sprigs around jar edges, creating natural frame
- Place floating candles gently on water surface
- Test stability by gently moving arrangement to ensure candles stay centered
Pro Tips for Success 🌟
Expert Insight: “The key to professional-looking mason jar centerpieces lies in the details. Use distilled water to prevent cloudiness, and trim eucalyptus stems at an angle for better water absorption.” – Sarah Mitchell, Wedding Planner
- Choose the right candles: 3-inch floating candles provide 4-5 hours of burn time
- Prevent tipping: Ensure bottom rocks create stable base before adding water
- Plan for venues: Many venues require flameless candles—LED floating options look surprisingly realistic
- Timing matters: Assemble water and greenery elements day-of to maintain freshness
2. Succulent Garden Centerpieces in Wooden Boxes
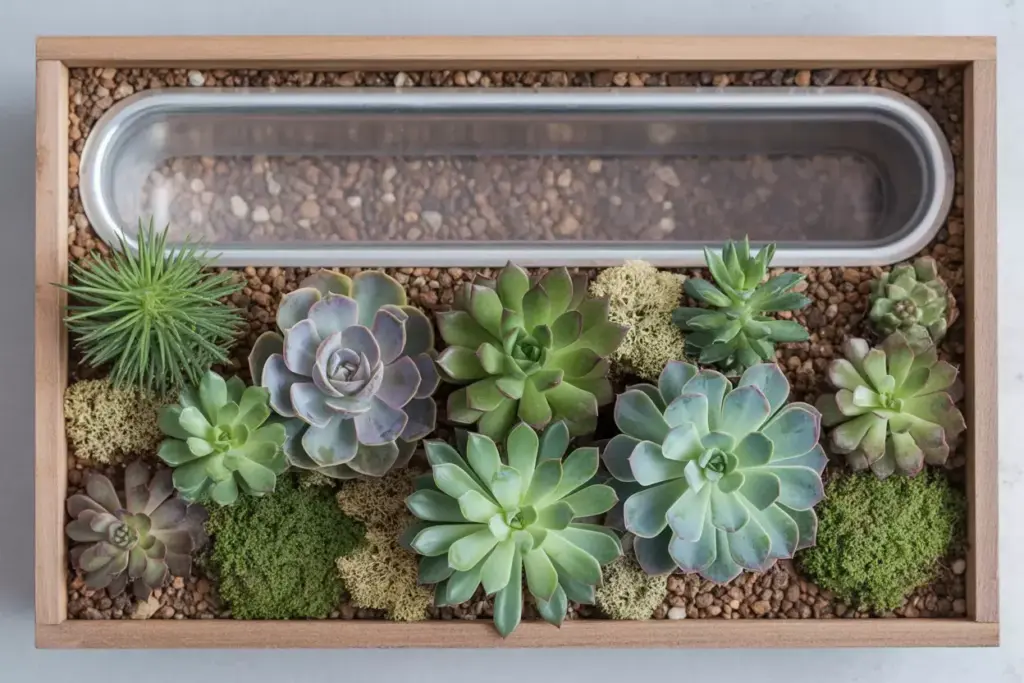
Succulent arrangements offer a modern, low-maintenance option that doubles as guest take-home gifts. This second style in our DIY wedding centerpieces you can make in a weekend collection appeals to eco-conscious couples seeking sustainable décor options.
Required Supplies
- Wooden boxes or rectangular planters (8×4 inches)
- Variety of small succulents (4-6 per box)
- Potting soil designed for succulents
- Decorative moss or small stones
- Plastic liner or landscape fabric
- Small garden trowel
- Spray bottle for misting
Construction Process
Box Preparation (45 minutes for 6 centerpieces)
- Line wooden boxes with plastic to protect wood from moisture
- Create drainage by poking small holes in liner bottom
- Add base layer of small stones for proper drainage
- Fill with soil leaving 1 inch from box rim
Planting Arrangement (1 hour total)
- Plan layout by arranging succulents in pots before planting
- Dig small holes appropriate for each plant’s root system
- Plant carefully ensuring roots are covered but stems remain above soil
- Add decorative elements like moss between plants for polished look
Design Variations and Styling Options
Color Scheme Approaches:
- Monochromatic green: Various shades and textures of green succulents
- Purple and silver: Echeveria and dusty miller combinations
- Mixed palette: Incorporate succulents with pink, blue, and orange tones
Seasonal Adaptations:
- Spring weddings: Add small flowering succulents like Kalanchoe
- Fall celebrations: Include burgundy and orange-toned varieties
- Winter events: Focus on silver and blue-green specimens
3. Vintage Book Stack Centerpieces with Fresh Flowers
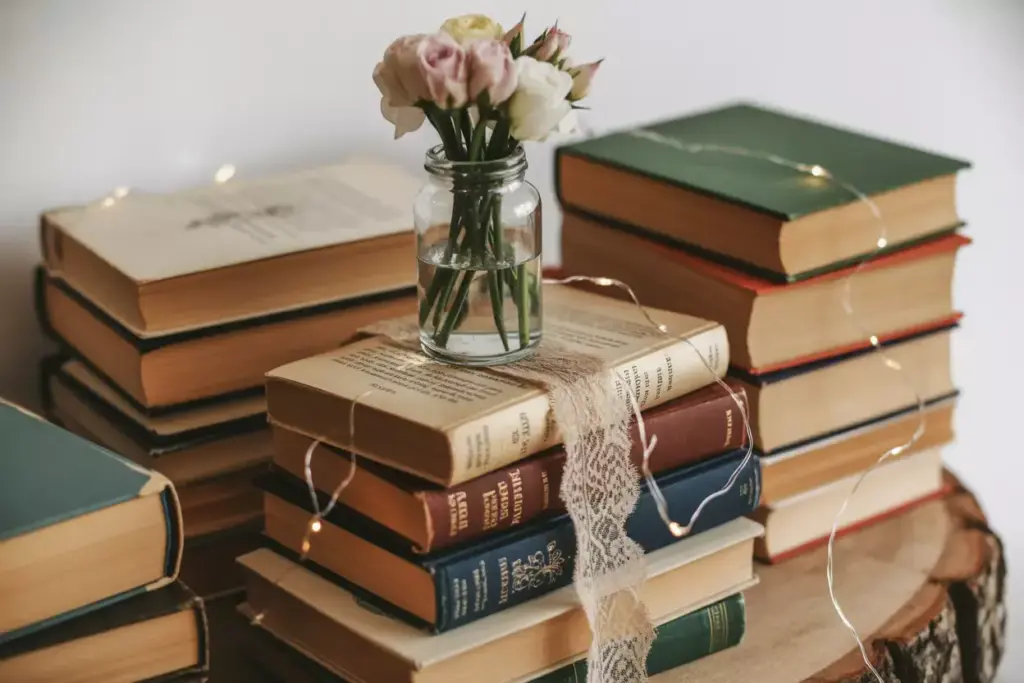
Literary-themed weddings gain charm with this third option from our 6 simple DIY wedding centerpieces you can make in a weekend guide. Book stack centerpieces work particularly well for library venues, garden parties, or couples who share a love of reading.
Gathering Materials
- 3-5 vintage books per centerpiece (varying sizes)
- Small glass vases or mason jars
- Fresh flowers (roses, peonies, or seasonal blooms)
- Vintage lace or ribbon
- Small battery-operated string lights
- Decorative bookmarks or vintage keys
Assembly Instructions
Book Selection and Preparation (30 minutes)
- Choose books strategically – select titles that reflect couple’s interests or wedding theme
- Vary sizes to create interesting visual levels and stability
- Clean book covers gently with slightly damp cloth
- Test stacking to ensure stable foundation for vase placement
Floral Integration (25 minutes per centerpiece)
- Position vase on top book, ensuring stability
- Create flower arrangement with 5-7 stems in complementary colors
- Wrap ribbon around book stack middle for cohesive look
- Add string lights weaving through books for magical ambiance
Creative Enhancement Ideas
Personalization Options:
- Include books from couple’s first date or meaningful shared reads
- Add handwritten love quotes on bookmarks
- Incorporate vintage family photos between book pages
- Use books in wedding colors or gold/silver accents
Practical Considerations:
- Protect valuable books: Use book-shaped boxes for expensive or sentimental volumes
- Venue requirements: Ensure adequate table space for book width
- Transportation: Pack books and flowers separately for easier setup
4. Geometric Terrarium Centerpieces
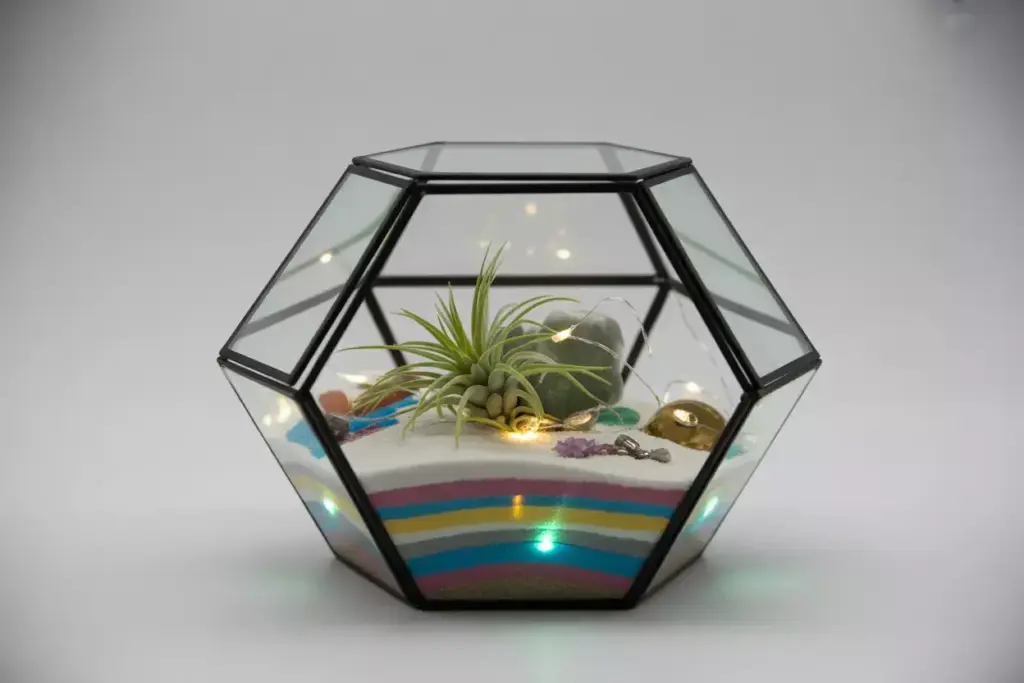
Modern couples gravitate toward clean lines and contemporary aesthetics found in geometric terrariums. This fourth style in our DIY wedding centerpieces you can make in a weekend collection brings sophisticated minimalism to reception tables.
Essential Components
- Glass geometric terrariums (various shapes: dodecahedron, cube, pyramid)
- Air plants (Tillandsia varieties)
- Colored sand or decorative stones
- Small decorative elements (crystals, shells, miniature figurines)
- LED string lights (battery-operated)
- Tweezers for precise placement
Step-by-Step Creation
Base Layer Design (20 minutes per terrarium)
- Plan color scheme using 2-3 complementary sand colors
- Layer sand carefully creating geometric patterns or ombre effects
- Add decorative stones for texture and visual interest
- Insert LED lights threading through sand layers for subtle illumination
Plant Installation (15 minutes per piece)
- Select air plants based on terrarium size and opening access
- Position plants using tweezers for precise placement
- Add final decorative touches like small crystals or meaningful objects
- Test lighting to ensure even distribution and battery function
Maintenance and Longevity Tips
Pre-Wedding Care:
- Mist air plants lightly 2-3 times per week
- Rotate terrariums occasionally for even light exposure
- Check battery levels in LED lights weekly
- Clean glass surfaces with lint-free cloth for crystal clarity
Post-Wedding Options:
- Guest favors: Smaller versions make memorable take-home gifts
- Home décor: Centerpieces transition beautifully to home decoration
- Plant propagation: Air plants multiply, providing future project materials
5. Lantern Centerpieces with Greenery and Fairy Lights
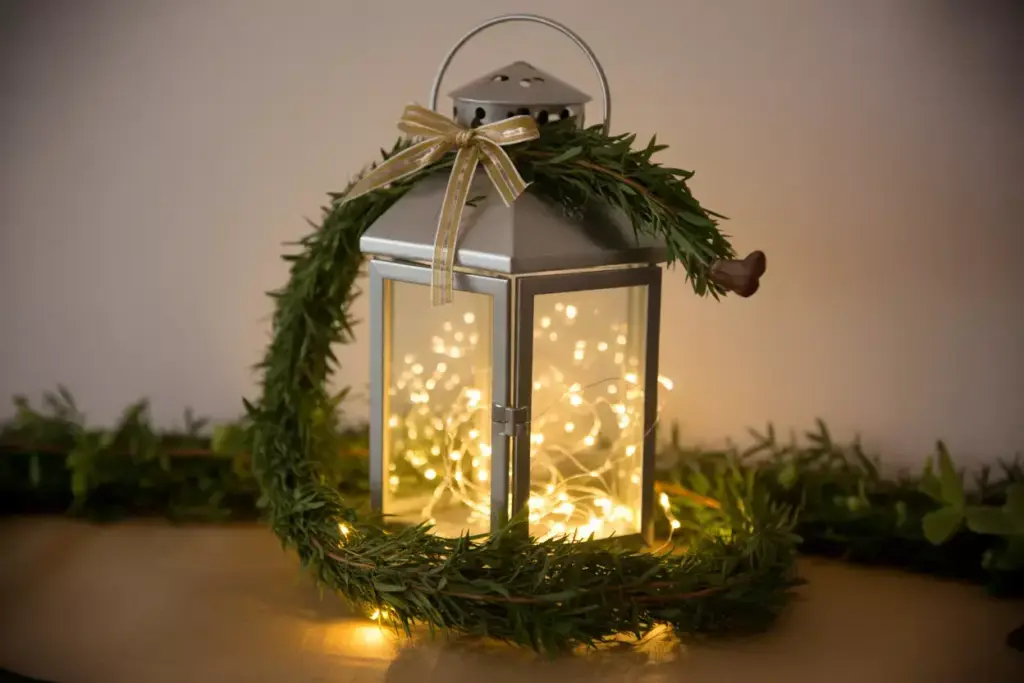
Romantic ambiance defines this fifth option in our 6 simple DIY wedding centerpieces you can make in a weekend collection. Lantern centerpieces work beautifully for evening receptions and outdoor celebrations where warm lighting creates magical atmosphere.
Required Materials
- Metal or wooden lanterns (8-12 inches tall)
- Battery-operated fairy lights (warm white)
- Fresh greenery (ivy, eucalyptus, or seasonal foliage)
- Floral wire or twist ties
- Small glass votives (optional)
- Ribbon in wedding colors
Construction Process
Lantern Preparation (15 minutes each)
- Clean lantern surfaces removing any dust or residue
- Test door mechanisms ensuring easy access for light installation
- Plan wire routing for fairy lights to avoid tangling
- Insert battery pack in base or hidden compartment
Greenery Integration (20 minutes per centerpiece)
- Wrap greenery around lantern base and handle using floral wire
- Create natural draping allowing some foliage to cascade naturally
- Secure with ribbon tied in elegant bow matching wedding colors
- Add fairy lights weaving through greenery for integrated glow
Styling Variations for Different Wedding Themes
Rustic Country Weddings:
- Use weathered wooden lanterns with burlap ribbon
- Incorporate wildflowers and wheat stalks
- Add mason jar votives around base
Elegant Garden Parties:
- Choose ornate metal lanterns with intricate details
- Use lush greenery like magnolia leaves or garden roses
- Incorporate silk ribbon in sophisticated colors
Beach or Coastal Celebrations:
- Select white-washed or nautical-style lanterns
- Add sea glass or shells to base decoration
- Use coastal plants like sea lavender or dune grass
6. Wine Bottle Centerpieces with Flowers and Candles
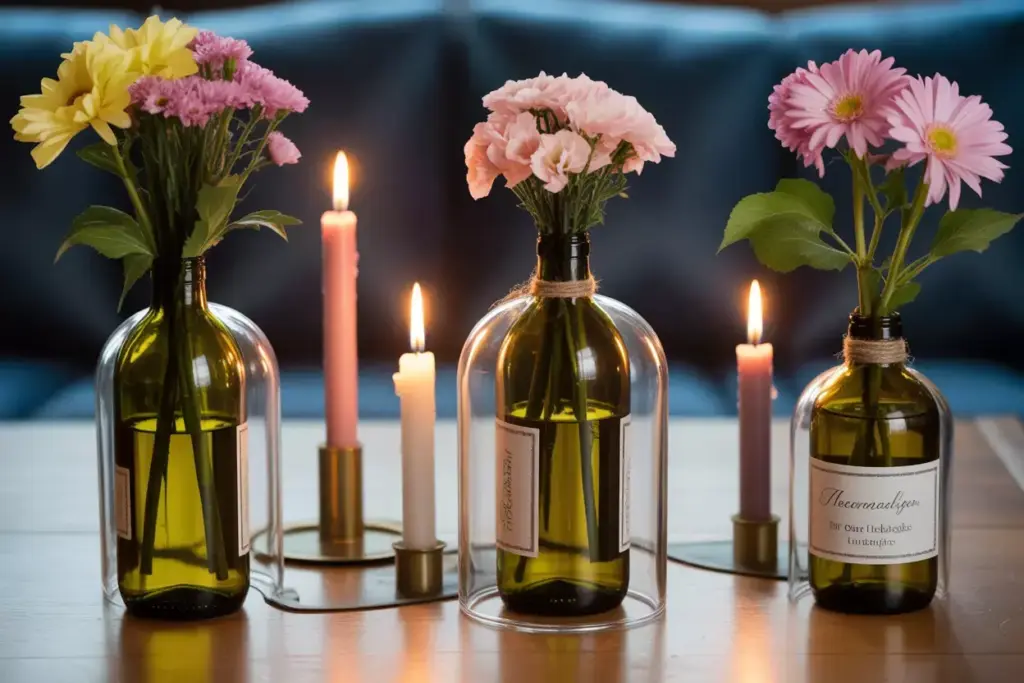
The final style in our 6 simple DIY wedding centerpieces you can make in a weekend guide transforms empty wine bottles into elegant floral displays. This option appeals to wine-loving couples and provides excellent conversation starters about favorite vintages or honeymoon destinations.
Materials and Tools Needed
- Empty wine bottles (3 per centerpiece, various heights)
- Glass cutter or bottle cutting kit
- Sandpaper (fine grit)
- Fresh flowers with sturdy stems
- Taper candles
- Decorative labels or twine
- Small funnel for water
Bottle Preparation Process
Cutting and Finishing (45 minutes for 6 bottles)
- Mark cutting lines at desired heights (vary between 6-10 inches)
- Score bottles carefully using glass cutter following manufacturer instructions
- Break cleanly along score lines using hot/cold water method
- Sand edges smooth to prevent cuts during handling and arrangement
Safety Considerations ⚠️
- Wear safety glasses during cutting process
- Use gloves when handling cut glass
- Work in well-ventilated area if using chemical etching
- Dispose of glass scraps properly in designated containers
Arrangement and Styling
Floral Integration (30 minutes total)
- Fill bottles with water using funnel to prevent spills
- Trim flower stems to appropriate heights for each bottle
- Arrange flowers creating varied heights and visual interest
- Group bottles in triangular or linear formations
Candle Addition (15 minutes)
- Select coordinating taper candles in wedding colors
- Secure in separate holders or wine bottle candle holders
- Test stability ensuring candles won’t tip during reception
- Plan lighting sequence for romantic ambiance timing
Label and Personalization Ideas
Custom Label Options:
- Table numbers: Replace traditional cards with wine bottle labels
- Love quotes: Add meaningful sayings or song lyrics
- Wedding date: Create commemorative labels with ceremony details
- Guest names: Use as place cards for intimate receptions
Essential Tips for Weekend DIY Success
Creating 6 simple DIY wedding centerpieces you can make in a weekend requires organization, patience, and strategic planning. These proven strategies help ensure smooth execution and professional-looking results.
Time Management Strategies
Friday Evening Setup (2 hours)
- Organize workspace with good lighting and ventilation
- Lay out all materials by project type
- Review instructions and watch tutorial videos
- Complete any prep work requiring drying time
Saturday Production Schedule:
- Morning (3 hours): Focus on most complex centerpieces first
- Afternoon (2 hours): Complete medium-difficulty projects
- Evening (1 hour): Quality check and minor adjustments
Sunday Finishing Touches:
- Morning (2 hours): Complete final centerpiece styles
- Afternoon (1 hour): Add fresh elements and final styling
- Evening (1 hour): Package for transport and create setup guides
Quality Control and Problem-Solving
Common Issues and Solutions:
| Problem | Quick Fix | Prevention |
|---|---|---|
| Unstable arrangements | Add weight to base, adjust height ratios | Test stability during assembly |
| Wilted flowers | Trim stems, change water, move to cool area | Use flower food, proper hydration |
| Insufficient lighting | Add battery backup, check connections | Test all electrical elements beforehand |
| Color mismatches | Adjust with ribbon or additional elements | Create color samples before purchasing |
Budget Optimization Techniques
Money-Saving Strategies 💡
- Buy in bulk: Purchase materials for multiple centerpieces simultaneously
- Shop sales cycles: Craft stores often have 40-50% off coupons
- Repurpose materials: Use containers and decorative elements from other wedding projects
- Seasonal timing: Choose flowers and plants in peak season for best prices
Quality vs. Cost Balance:
- Invest in containers: Quality vases and bases can be reused post-wedding
- Save on flowers: Mix expensive blooms with budget-friendly greenery
- DIY alternatives: Create custom elements instead of buying pre-made decorations
Troubleshooting Common DIY Centerpiece Challenges
Even well-planned DIY wedding centerpieces you can make in a weekend can encounter unexpected obstacles. Preparation for common challenges prevents last-minute stress and ensures backup solutions.
Transportation and Setup Solutions
Packing Strategies:
- Use sturdy boxes with dividers to prevent shifting during transport
- Pack components separately – assemble final elements at venue
- Create assembly instructions with photos for wedding day helpers
- Bring repair kit including extra flowers, glue, wire, and batteries
Venue Considerations:
- Check table dimensions before finalizing centerpiece sizes
- Confirm candle policies – many venues require flameless alternatives
- Plan for setup time allowing 15-20 minutes per table
- Designate helpers who understand arrangement placement and spacing
Weather and Environmental Factors
Outdoor Wedding Adaptations:
- Wind protection: Choose heavier bases and lower profiles
- Temperature concerns: Select heat-tolerant flowers and battery-operated lighting
- Backup plans: Prepare indoor alternatives for severe weather
- Timing adjustments: Set up closer to event time to maintain freshness
Indoor Venue Challenges:
- Lighting conditions: Test how centerpieces look under venue lighting
- Space constraints: Ensure arrangements don’t obstruct guest conversation
- Temperature control: Account for air conditioning effects on fresh flowers
- Sound considerations: Avoid materials that create noise when moved
Final Styling and Presentation Tips
The success of 6 simple DIY wedding centerpieces you can make in a weekend depends heavily on final presentation and styling details that elevate handmade pieces to professional standards.
Professional Finishing Techniques
Visual Cohesion Strategies:
- Consistent color palette: Ensure all centerpieces share 2-3 core colors
- Varied heights: Create visual interest with different elevation levels
- Balanced proportions: Match centerpiece scale to table size and guest count
- Quality lighting: Test all battery-operated elements before event day
Detail Enhancement:
- Clean lines: Remove any visible glue, wire, or construction evidence
- Fresh elements: Add flowers and greenery on wedding day for maximum impact
- Coordinated accessories: Match ribbons, candles, and decorative elements across all styles
- Backup components: Bring extra flowers and batteries for last-minute touch-ups
Integration with Overall Wedding Design
Coordination Elements:
- Linens and place settings: Ensure centerpieces complement table décor
- Lighting ambiance: Plan centerpiece illumination timing with reception lighting
- Guest interaction: Position arrangements to encourage conversation, not obstruct it
- Photography considerations: Create arrangements that photograph well from multiple angles
Conclusion
Creating 6 simple DIY wedding centerpieces you can make in a weekend transforms wedding planning from stressful expense into enjoyable creative expression. These handcrafted arrangements not only save hundreds of dollars but also provide meaningful personal touches that reflect the couple’s unique style and story.
The weekend timeline proves that beautiful, professional-looking centerpieces don’t require extensive crafting experience or expensive materials. With proper planning, quality supplies, and attention to detail, any couple can create stunning focal points that rival high-end floral arrangements.
Actionable Next Steps
Week 1: Choose your favorite 2-3 centerpiece styles and create detailed supply lists
Week 2: Shop for materials, taking advantage of sales and bulk purchasing opportunities
Week 3: Complete practice runs of each chosen design to refine techniques
Week 4: Execute your weekend creation marathon, following the structured timeline
Week 5: Add fresh elements and transport to venue with confidence
Remember that the most beautiful centerpieces reflect the personalities and love story of the couple creating them. Whether you choose rustic mason jars, modern geometric terrariums, or elegant wine bottle arrangements, the personal investment and care you put into these DIY wedding centerpieces you can make in a weekend will shine through on your special day.
The memories created during your crafting weekend—laughing over crooked arrangements, problem-solving design challenges, and seeing your vision come to life—often become as treasured as the wedding day itself. These centerpieces represent more than décor; they symbolize the creativity, teamwork, and love that will define your marriage journey ahead.
References
[1] The Knot. (2026). Real Weddings Study: Average Wedding Costs and Statistics. Retrieved from theknot.com/wedding-cost-statistics