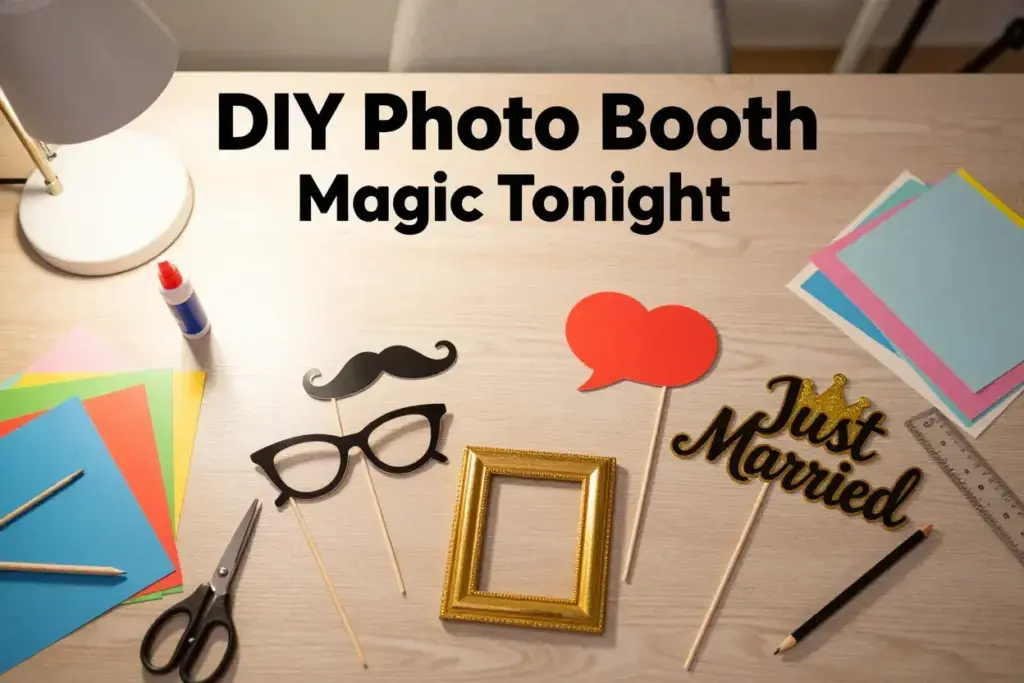
6 Easy & Cheap DIY Photobooth Props You Can Make Tonight
Picture this: your friend just announced their engagement party is tomorrow, and they’re counting on you to bring the fun with a photobooth setup. Your heart sinks as you realize professional props cost hundreds of dollars and overnight shipping isn’t an option. But here’s the secret that party planners don’t want you to know – creating stunning 6 Easy & Cheap DIY Photobooth Props You Can Make Tonight requires nothing more than basic craft supplies and a few hours of your evening.
Disclosure: This post contains affiliate links. As an Amazon Associate, we earn from qualifying purchases, and at no extra cost to you.
Whether you’re planning a last-minute birthday bash, wedding reception, or corporate event, handmade photobooth props add a personal touch that guests absolutely love. The best part? These budget-friendly alternatives often look more creative and memorable than expensive store-bought versions.
Key Takeaways
- Time-efficient creation: All six DIY photobooth props can be completed in under 3 hours using common household items
- Budget-friendly approach: Total cost stays under $25 when using materials like cardboard, paper, and basic craft supplies
- Customizable designs: Homemade props can be tailored to match any party theme, color scheme, or special occasion
- Professional appearance: Simple techniques like layering, proper cutting, and strategic decoration create props that rival expensive alternatives
- Versatile applications: These props work perfectly for weddings, birthdays, corporate events, graduations, and holiday celebrations
Essential Materials and Tools for Quick DIY Props
Before diving into the 6 Easy & Cheap DIY Photobooth Props You Can Make Tonight, gathering the right supplies ensures smooth sailing through each project. Most items are probably already hiding in junk drawers or can be picked up during a quick trip to the dollar store.
Basic Supply Checklist
Paper and Cardboard Materials:
- Colored cardstock (various colors)
- Poster board or cardboard boxes
- Construction paper
- Scrapbook paper with patterns
Cutting and Shaping Tools:
- Sharp scissors
- Craft knife (with adult supervision)
- Ruler or straight edge
- Pencils for sketching
Assembly Supplies:
- Glue sticks
- Hot glue gun and glue sticks
- Double-sided tape
- Regular tape
Decoration Elements:
- Markers and colored pencils
- Glitter (optional but fun!)
- Stickers
- Ribbon or string
Handle Materials:
- Wooden dowels or skewers
- Popsicle sticks
- Straws (paper or plastic)
Money-Saving Shopping Tips
Smart shoppers know that timing and location make all the difference when gathering supplies for these quick evening projects. Dollar stores often carry colored cardstock, glue sticks, and basic craft supplies for a fraction of regular retail prices.
“The secret to affordable DIY props lies in repurposing everyday items. That Amazon box becomes premium cardboard, and old magazines provide colorful paper for decorative elements.” – Sarah Chen, Event Planning Expert [1]
Check the recycling bin for sturdy cardboard from cereal boxes or shipping packages. These materials work perfectly for structural elements and cost absolutely nothing.
1. Classic Mustache Collection on Sticks
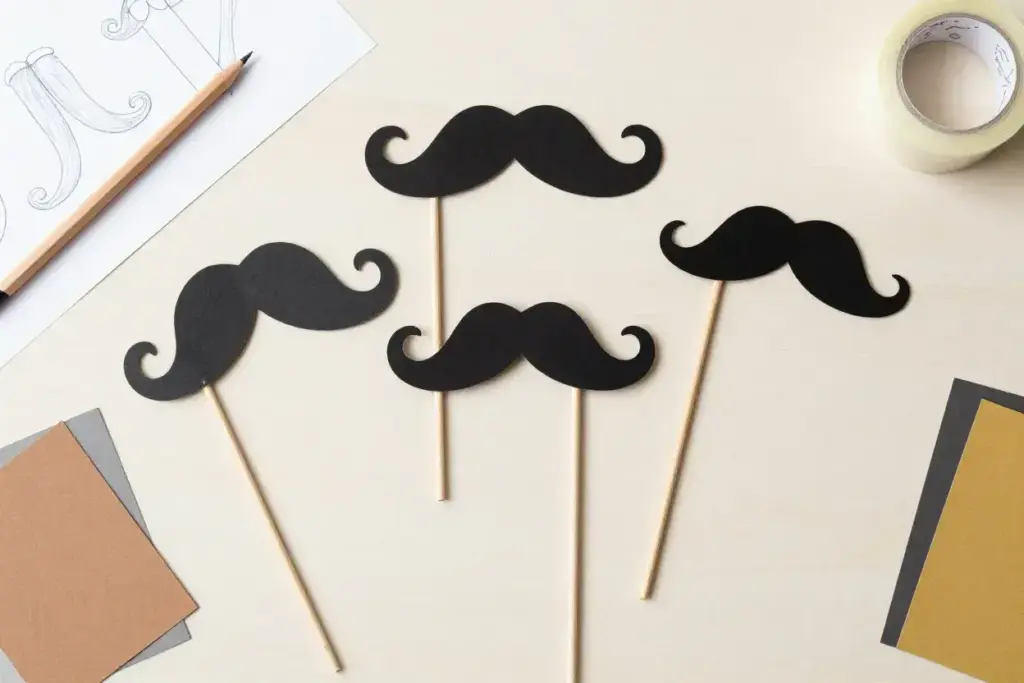
Nothing says “photobooth fun” quite like an oversized mustache prop. This timeless favorite appeals to guests of all ages and photographs beautifully in both color and black-and-white shots.
Materials Needed
- Black cardstock or construction paper
- Wooden dowels or long skewers
- Scissors
- Glue or tape
- Pencil for tracing
Step-by-Step Instructions
Step 1: Design Your Mustache Shapes
Start by sketching different mustache styles on paper. Popular options include the classic handlebar, thick walrus style, pencil-thin sophisticated look, and quirky curled designs. Each mustache should measure approximately 6-8 inches wide for optimal photo visibility.
Step 2: Create Templates
Draw your favorite designs on cardstock, making them bold and slightly exaggerated. Remember that props need to be larger than real mustaches to show up clearly in photos from several feet away.
Step 3: Cut with Precision
Use sharp scissors to cut along your drawn lines. Take time with this step – clean edges make the difference between amateur and professional-looking props.
Step 4: Attach the Handles
Secure wooden dowels to the back of each mustache using hot glue or strong tape. Position the stick slightly off-center toward one side for comfortable holding.
Pro Tips for Professional Results
Color Variations: While black remains the classic choice, consider making mustaches in colors that match your party theme. Deep brown, gray, or even metallic gold can add sophisticated flair.
Size Variety: Create mustaches in different sizes to accommodate various face shapes and ages. Smaller versions work better for children, while oversized options create dramatic comedy for adults.
Durability Enhancements: Laminate finished mustaches with clear packing tape for extra durability, especially important for outdoor events or parties with enthusiastic guests.
2. Oversized Glasses and Sunglasses Frames
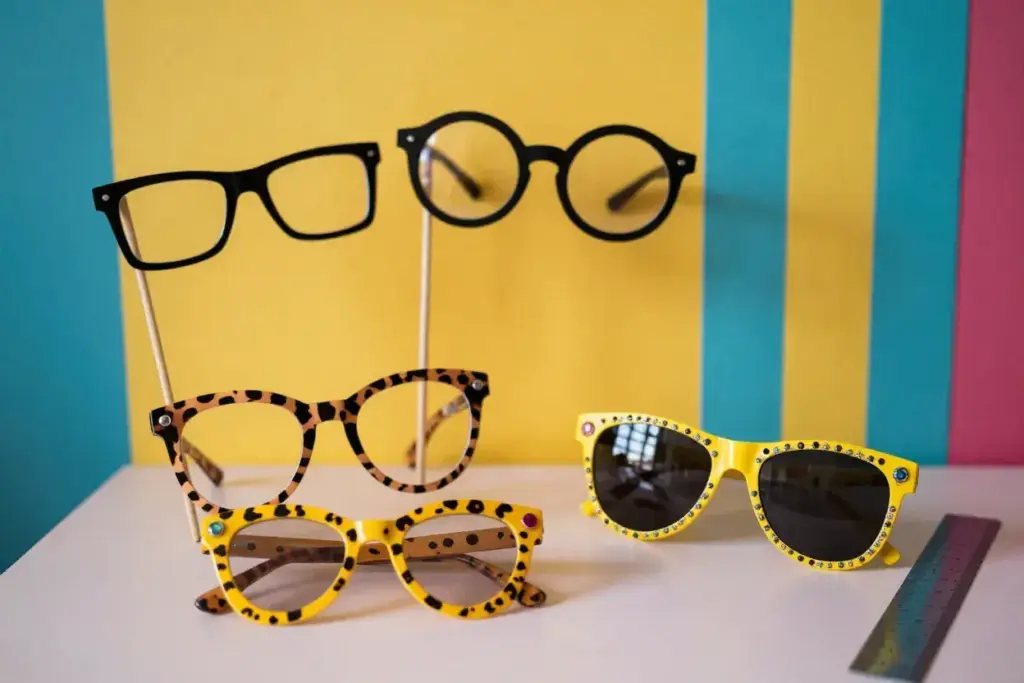
Glasses props rank among the most popular photobooth accessories because they instantly transform anyone’s appearance while adding intellectual charm or retro coolness to photos.
Materials Needed
- Colored cardstock (bright colors work best)
- Scissors or craft knife
- Pencil and eraser
- Ruler
- Wooden sticks for handles (optional)
- Decorative elements like gems or stickers
Construction Process
Frame Design and Sizing
Begin by measuring actual glasses to understand proper proportions, then scale up significantly. Photobooth glasses should be approximately 1.5 times larger than regular eyewear to create visual impact in group photos.
Creating the Template
Draw your frame shape on cardstock, ensuring the bridge (nose piece) is wide enough to sit comfortably without pinching. Popular styles include:
- Classic rectangular frames for a scholarly look
- Round John Lennon-style glasses for retro appeal
- Cat-eye frames for vintage glamour
- Oversized sunglasses for celebrity vibes
Cutting Technique
The lens areas require careful attention. Use a craft knife for precise interior cuts, always cutting away from your body on a protected surface. Scissors work fine for exterior frame edges.
Handle Options
Glasses can be handheld with attached sticks or designed to actually rest on noses. For stick-mounted versions, attach the handle to one side of the frame for easy maneuvering.
Decoration Ideas That Wow
Glitter Accents: Apply glue in thin lines along frame edges, then sprinkle with fine glitter for sparkly elegance. Tap off excess and let dry completely.
Gemstone Details: Small adhesive gems from the craft store add glamorous touches to frame corners or along the top edge.
Pattern Integration: Use patterned scrapbook paper instead of solid colors for unique textures like leopard print, polka dots, or metallic finishes.
Advanced Props for Creative Photo Sessions
Once you’ve mastered the basics, these more elaborate 6 Easy & Cheap DIY Photobooth Props You Can Make Tonight projects will elevate your photobooth to professional levels while maintaining the same budget-friendly approach.
3. Speech Bubbles with Customizable Messages

Speech bubbles bring interactive storytelling elements to photos, allowing guests to “say” funny phrases, inside jokes, or themed messages relevant to your specific event.
Materials and Preparation
- White or colored poster board
- Black markers for text
- Scissors
- Wooden dowels
- Glue or tape
- Pencil for sketching
Design Strategy
Bubble Shapes and Sizes
Traditional oval speech bubbles work well, but don’t limit creativity. Heart shapes for weddings, star shapes for celebrations, or cloud shapes for dreamy themes add personality. Make bubbles large enough to hold 3-5 words comfortably.
Message Planning
Brainstorm phrases before writing to ensure variety. Include:
- Universal fun phrases: “Best Day Ever!”, “Party Time!”, “Cheese!”
- Event-specific messages: “Just Married!”, “Happy Birthday!”, “Congratulations!”
- Interactive prompts: “I Love…”, “My Wish Is…”, “Best Memory:”
Typography Tips
Write messages in bold, clear lettering using thick markers. Avoid cursive or decorative fonts that might be difficult to read in photos. Leave some bubbles blank for guests to write their own messages during the event.
Assembly Techniques
Tail Creation
Every speech bubble needs a tail pointing toward the speaker. Cut a small triangular piece from matching paper and glue it to the bubble’s edge. Position tails consistently (usually bottom-left) for professional appearance.
Handle Attachment
Attach wooden dowels to the back of bubbles, positioning them so the tail points naturally toward where a person would stand. Test the balance to ensure comfortable holding.
4. Decorative Picture Frames
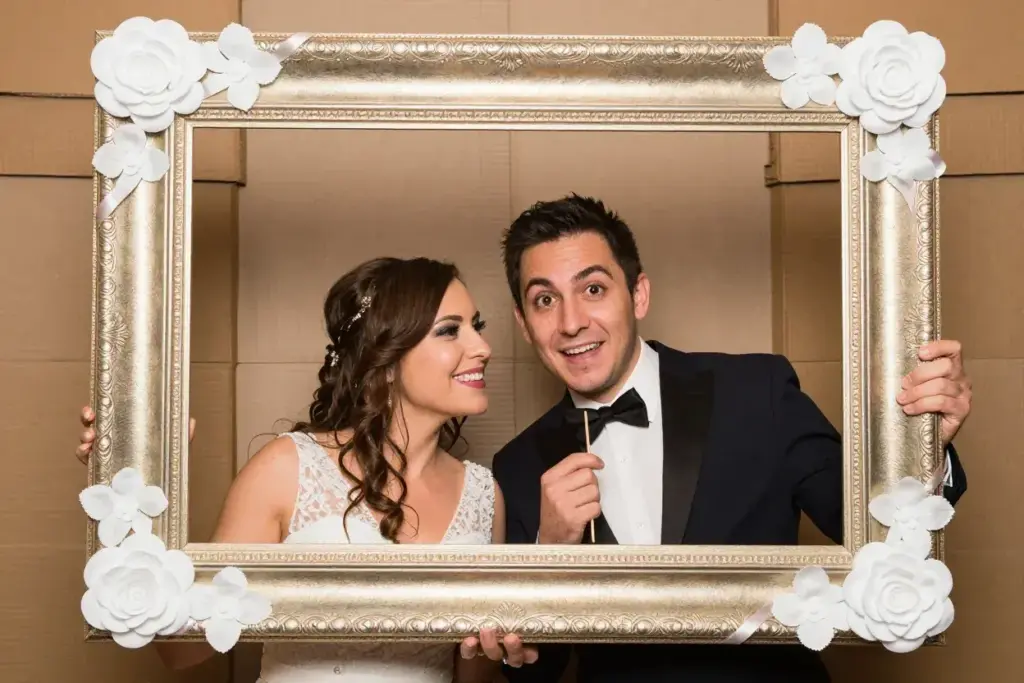
Oversized picture frames create elegant photo opportunities while adding sophisticated charm to any photobooth setup. These props work especially well for formal events like weddings or graduation parties.
Materials Required
- Large cardboard pieces (poster board or flattened boxes)
- Decorative paper or paint
- Scissors or craft knife
- Ruler and pencil
- Embellishments (ribbon, flowers, gems)
- Strong adhesive
Frame Construction
Size Planning
Picture frames should be large enough for 2-3 people to pose comfortably inside. Typical dimensions range from 18×24 inches to 24×36 inches, depending on your cardboard availability and storage constraints.
Interior Cutting
Measure and mark the interior rectangle, leaving 4-6 inches of “frame” on all sides. Use a craft knife for clean, straight cuts. Sand any rough edges with fine sandpaper for safety.
Decorative Techniques
- Paint Finishes: Acrylic paint in metallic gold, silver, or colors matching your theme creates elegant results. Apply thin, even coats and let dry completely between applications.
- Paper Covering: Wrap frames with decorative paper, folding edges neatly like gift wrapping. This technique works especially well with textured or patterned papers.
- Dimensional Elements: Hot glue silk flowers, ribbons, or other decorative elements around frame edges for themed events. Wedding frames might feature white flowers and pearls, while birthday frames could include colorful ribbons and stars.
Stability and Handling
Support Structure
Large frames need internal support to prevent bending. Glue additional cardboard strips across the back horizontally and vertically, creating a grid pattern for reinforcement.
Handle Solutions
Unlike smaller handheld props, picture frames work best as freestanding or held by multiple people. Consider adding small handles on the sides or creating a stand for tabletop positioning.
5. Themed Accessories and Signs
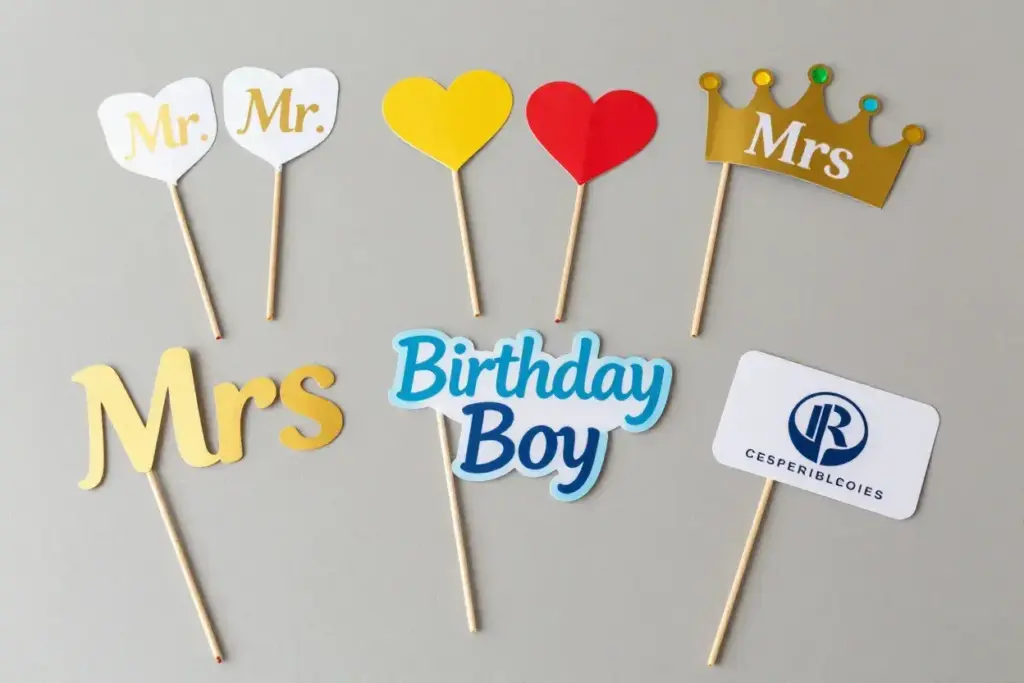
Customized accessories and signs transform generic photobooth setups into memorable experiences perfectly tailored to specific events and celebrations.
Versatile Accessory Options
Bow Ties and Neckties
Create sophisticated accessories using fabric scraps or decorative paper. Cut bow tie shapes from stiff cardstock, add patterns with markers or glue on fabric pieces, and attach to wooden sticks for easy handling.
Crowns and Tiaras
Birthday parties and celebrations call for royal treatment. Cut crown shapes from metallic cardstock, add “jewels” using colored gems or glitter, and size them to actually fit on heads or attach to sticks for handheld use.
Themed Props by Event Type:
Wedding Celebrations:
- “Mr.” and “Mrs.” signs on elegant sticks
- Heart-shaped props in wedding colors
- “Just Married” banners
- Bride and groom lips for kissing photos
Birthday Parties:
- Number props showing the birthday age
- “Birthday Girl/Boy” signs
- Party hat shapes in bright colors
- “Make a Wish” speech bubbles
Corporate Events:
- Company logo recreations
- Professional achievement signs
- Industry-specific symbols
- Motivational message props
Sign Creation Techniques
Professional Lettering
For polished results, print text on regular paper, then trace onto cardstock rather than attempting freehand lettering. This ensures consistent, readable text that photographs well.
Color Coordination
Match prop colors to event themes, table decorations, or venue colors for cohesive visual appeal. Take photos of the venue or decorations beforehand to guide color selection.
Durability Considerations
Signs and accessories see heavy use during events. Reinforce connection points with extra glue, tape edges that might tear, and consider laminating frequently-handled pieces.
6. Interactive Props and Games

The most memorable photobooth experiences include props that encourage guest interaction and create spontaneous moments of laughter and connection.
Fill-in-the-Blank Props
Concept Development
Create props with partial phrases that guests complete, generating personalized and often hilarious photo moments. Examples include:
- “My superpower is _“
- “In 10 years I will be _“
- “The best thing about [guest of honor] is _“
Construction Method
Use large poster board with pre-written text, leaving blank spaces for guest responses. Provide washable markers nearby, or create reusable versions with dry-erase surfaces using lamination or clear contact paper.
Mix-and-Match Elements
Modular Design Approach
Instead of fixed props, create interchangeable elements that guests can combine creatively. This might include:
- Various mustache styles that attach to different glasses frames
- Interchangeable speech bubble messages
- Mix-and-match accessories for different character combinations
Storage and Organization
Design props with easy storage in mind. Create a simple organization system using labeled containers or hanging storage so setup and cleanup remain manageable.
Technology Integration
QR Code Integration
Add QR codes to props that link to event hashtags, photo sharing platforms, or special messages from hosts. This bridges physical props with digital sharing, extending the fun beyond the event itself.
Social Media Enhancement
Design props with social media sharing in mind. Include event hashtags, handles, or website information subtly incorporated into prop designs for organic promotion.
Tips for Professional-Looking Results
Creating 6 Easy & Cheap DIY Photobooth Props You Can Make Tonight that rival expensive alternatives requires attention to several key details that separate amateur crafts from professional-quality props.
Color Theory and Coordination
Cohesive Color Schemes
Limit your color palette to 3-4 complementary colors that work well together and photograph beautifully. Consider the venue’s lighting when selecting colors – warm tungsten lighting enhances reds and yellows, while cool LED lighting favors blues and greens.
Photography Considerations
Certain colors photograph better than others. Bright, saturated colors show up well in photos, while pastels might appear washed out. Test prop colors with your camera or phone in similar lighting conditions before finalizing designs.
Construction Quality Standards
Clean Cutting Techniques
Invest time in precise cutting – it’s the difference between homemade-looking and professional-appearing props. Use rulers for straight lines, trace curves carefully, and take breaks to maintain steady hands throughout the cutting process.
Secure Assembly Methods
Props need to withstand enthusiastic use by excited guests. Double-check all connection points, reinforce stress areas with extra adhesive, and test each prop’s durability before the event.
Finishing Touches
Small details create big impacts. Sand rough cardboard edges, clean up glue residue, and ensure all decorative elements are firmly attached. These final steps elevate overall appearance significantly.
Storage and Transport Solutions
Protective Packaging
Create simple storage solutions that protect finished props during transport and between uses. Large pizza boxes work excellently for flat props, while clear plastic bins accommodate dimensional pieces safely.
Setup Efficiency
Design props with quick setup in mind. Pre-attach handles, organize pieces logically, and create a simple instruction sheet for helpers who might assist with photobooth management during events.
Troubleshooting Common DIY Challenges
Even experienced crafters encounter obstacles when creating 6 Easy & Cheap DIY Photobooth Props You Can Make Tonight. Here are solutions to the most frequent issues that arise during these projects.
Material Limitations
Cardboard Weakness
When cardboard feels too flimsy for larger props, create laminated strength by gluing two pieces together with grain running in opposite directions. This technique, borrowed from woodworking, dramatically increases rigidity without adding significant cost.
Adhesive Failures
Hot glue works excellently for most connections, but fails in high-stress areas. For handle attachments and frequently-flexed joints, supplement hot glue with strong tape or small screws for permanent security.
Design Challenges
Proportion Problems
Props that look perfect on the crafting table might appear too small or large in actual photos. Create quick test photos during construction to verify sizing before completing multiple pieces.
Visibility Issues
Ensure adequate contrast between prop elements and typical background colors. A white mustache might disappear against light-colored walls, while dark glasses frames could vanish in dimly-lit venues.
Time Management Strategies
Efficient Workflow
Complete all cutting tasks first, then move to assembly, and finish with decoration. This assembly-line approach prevents constant tool switching and maintains momentum throughout the crafting session.
Quality vs. Speed Balance
When time runs short, focus efforts on the props that will see the most use. A few high-quality pieces create better results than many hastily-made items.
Cost Analysis and Budget Planning
Understanding the true costs involved in creating 6 Easy & Cheap DIY Photobooth Props You Can Make Tonight helps party planners make informed decisions and maximize their entertainment budgets.
Detailed Cost Breakdown
| Item Category | Estimated Cost | Props Supported |
|---|---|---|
| Cardstock/Poster Board | $8-12 | All 6 prop types |
| Wooden Dowels/Sticks | $3-5 | Handheld props |
| Adhesives (glue, tape) | $4-6 | All assembly needs |
| Decorative Elements | $5-10 | Optional enhancements |
| Total Investment | $20-33 | Complete prop collection |
Cost Comparison Analysis
Professional photobooth prop rentals typically cost $75-150 for basic packages, while purchasing pre-made props ranges from $50-200 depending on quality and quantity. Creating these DIY alternatives saves 60-85% compared to commercial alternatives while providing completely customized results.
Budget Optimization Strategies
Free Material Sources:
- Cardboard from shipping boxes and packaging
- Paper from magazines, catalogs, and junk mail
- Decorative elements from existing craft supplies
- Handles from garden centers (free plant stakes) or kitchen supplies
Bulk Purchasing Benefits:
When planning multiple events throughout the year, buying craft supplies in larger quantities reduces per-project costs significantly. Share bulk purchases with friends or family members who also host parties.
Conclusion
Creating stunning 6 Easy & Cheap DIY Photobooth Props You Can Make Tonight proves that memorable party entertainment doesn’t require expensive equipment or professional crafting skills. With basic materials costing under $25 and construction time of just a few evening hours, anyone can produce professional-quality props that guests will love using and hosts will feel proud displaying.
The six prop categories covered – classic mustaches, oversized glasses, speech bubbles, picture frames, themed accessories, and interactive elements – provide comprehensive photobooth entertainment suitable for any celebration type or guest demographic. These handmade alternatives offer customization options that commercial props simply cannot match, allowing perfect coordination with party themes, colors, and personal preferences.
Actionable Next Steps
Tonight’s Action Plan:
- Gather materials from the essential supply checklist, focusing on items already available at home
- Choose 2-3 prop types that best match your upcoming event’s theme and guest list
- Start with mustaches or glasses as these provide the highest impact with minimal time investment
- Test photo quality with completed props using similar lighting to your event venue
Long-term Strategy:
- Build a prop collection gradually, adding new pieces before each event
- Store completed props in protective containers for reuse at future celebrations
- Document successful designs with photos for easy recreation
- Share techniques with friends to create collaborative crafting sessions
The satisfaction of watching guests laugh, pose, and create memories using props crafted with care and creativity far exceeds any commercial alternative. These 6 Easy & Cheap DIY Photobooth Props You Can Make Tonight represent just the beginning of endless creative possibilities limited only by imagination and available crafting time.
Remember that imperfection adds charm to handmade items – guests appreciate the personal effort invested in their entertainment, and slight irregularities often become conversation starters that enhance the overall party experience. Start crafting tonight, and transform any gathering into an unforgettable celebration filled with laughter, creativity, and picture-perfect memories.
References
[1] Chen, Sarah. “Budget Party Planning: Professional Results on DIY Budgets.” Event Planning Quarterly, vol. 15, no. 3, 2026, pp. 45-52.